


Implementing motion pattern recognition using tinyML on the Sony Spresense.
- Carlos Gustavo Merolla

- Dec 6, 2020
- 8 min read
Updated: Mar 22, 2021

The work pipeline
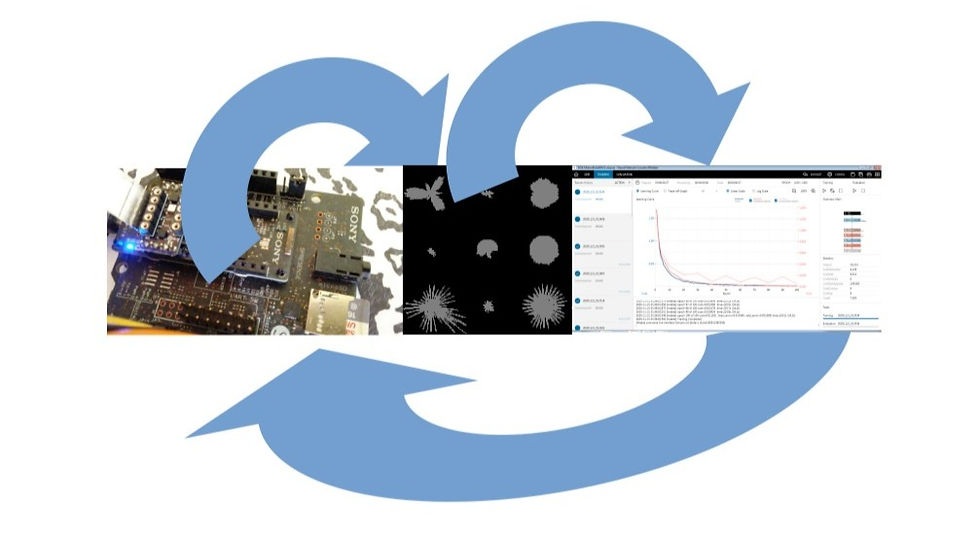
This picture summarizes the process of gathering samples, defining the neural network model, training and evaluating it and then pushing the resulting model back into the Sony Spresense. for the implementation of this demo I use the Sony Spresense + an extension board with the SD Card reader + a ROHM's sensor add-on (Accelerometer and Magnetometer) + an LCD display (for debug purposes only) and the Sony Neural Network console. In the following paragraphs I will describe each step in detail. The code used for generating the samples will be released soon on the Download section (you will ask me for a password to access it and tell me why you need it, of course, no cost at all)
I will make this as simple as possible, no math notation, and some shortcuts to make it as easy as possible. I won't re-write what is already written either, if you need some detail about the Sony Neural Network console, you can check the official documentation.
The typical process for ML is iterative (not to say try and error), this picture summarizes the steps, you will repeat this until you get the desired prediction accuracy and size of the model. The Sony Neural Network console has an interesting feature, the automatic structure finding, that means, you will leave your machine trying different approaches until good results are reached.

Gathering sample data
This process is key, good data leads to good results. I am writing a paper to be published on researchGate or a similar place describing how to obtain consistent data As you can imagine, it is not the same to try to capture a fast move from a Jaguar than a slow one from a cow, the duration of sample gathering will be different, the start of the recording will be different too. Again, there is a draft on the download zone describing the sampling windows.
I use the Spresense and the sensor to generate the samples, those samples, will be stored as files in order to be used as input data for the training process. The data representation I chose will allow to compress images without missing the relevant characteristics of the sampling, I used 180 x 60 pixel samples and 60 x 20 pixel samples without loosing accuracy (the smaller the image, the less memory used). The sample data looks like this:


Each image contains a graphical representation of the forces being applied to each axis (X, Y, Z) that means, lateral and vertical forces. I used the same Spresense + Sensor to generate these representations, there is where I think edgeImpulse would help me to go even more lazier! I spent sometime making different moves to generate a reasonable number of samples. I created two folders, one for the soft motion patterns and another one for the violent ones. These folders will serve as labels, everything inside the soft folder will be tagged or labeled as "soft", that is one way to generate datasets using the Sony Neural Network Console. The majority of the samples will be used for the training dataset and a fewer samples will be used as the validation dataset. The sample you placed on the validation datasets shouldn't be present in the training dataset, that way, you will make it sure that your NN reacts good with new inputs, that belongs to the evaluation process that you will run after the training process.
Designing the Neural Network model and some concepts
Neural networks sound scary to some people, however, you can think about them (in general terms) as a set of connected layers, each layer will do something relevant in the process of providing an output (the output of one layer must be compatible with the input for the next one). Every network will have an input layer, that input layer has to match the information you will provide to the network for training and inference purposes. In our case, we are going to feed the network with black and white (1 dimension) 60 x 20 pixels samples. I also used 180 x 60 pixels with very good results and still low memory requirements.

After the input you will have a series of layers working together, some of the layers apply some calculations (i.e. multiplying the number by a given value and adding another one, weight and bias in strict terms), other simply applies a function to normalize data, for instance, if you are dealing with numbers between 0 and 255 a function like Tangent could be used internally to translate those values to smaller ones (0...[1]). In our reference Network we are going to use a convolution layer (as the one described above) and a fully connected network, the main purpose of this is to shrink the model as much as possible. Finally, the network has to have a kind of selector for the output value, in this case, we are going to get an array of the potential candidates for the guess, the top index will be the one with major chances of being an accurate hit.
Creating the project
As I mentioned before, we are going to use the Sony Neural Network Console, it is an easy to use tool, almost everything is done by dragging and dropping things and it has all you need to export the resulting model to be used by the Spresense DNNRT (Deep Neural Network Runtime). I am not a big fan of writing what it is already written nor a fan of step by step tutorials either, so, if you need some specific details, go and see the official documentation from Sony here: dl.sony.com
The entire process will take you minutes. The first thing you will do is to create a new project, the second step is to specify the datasets you are going to use. You will got to the dataset tab, create dataset and pick the datasets. Creating the dataset is just a matter of selecting the folders that contain the sample, tell what type of image they are, their size, if you want resizing or not, etc. In this case, 180x60 pixels or 60x20 pixel black and white, no resizing nor padding needed. You will create two datasets, one named training and the other one named validation, being training the main dataset. Once the datasets are in place, you will define the network.

To define the network, you will go to the edit tab and drag and drop the layers you need (the ones that are shown in the following picture), the layers are selected from the left-side panel. You will also have to connect each layer and specify some parameters like the ones shown in the picture (number of out maps for instance) As simple as that. I think this is enough to illustrate the process, I will explain the role of each layer on a future post, but if you are curious now, you can download the PDF manual and find all the details there. The NN model edit looks like this:

Once the datasets and the Network model are in place, you will train the network. Training the network is an automatic process, you just click on the train icon and the process will start. You will see some graphics showing the learning progress. Before training the network you can specify the number of times (epoch) you want the process to try and the amount of data to be process together (the batch size), you find all those parameters on the config menu, you could also set other performance related settings such as the use of GPUs, etc. However, as this is a relatively small NN with relatively small datasets, you won't have to worry about those details. Some NN will take days to be trained, this one will take a few minutes. During the training process, you will see something like this:

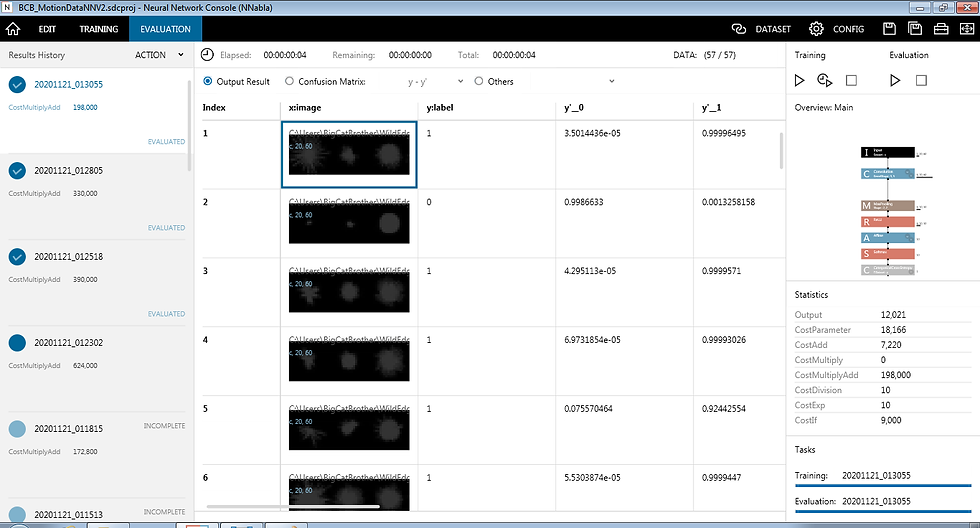
Once the network is trained you have to run the evaluation to see how good it is. Again, this will be another automatic process and the end result will be all the images you placed on the validation datasets and the prediction made by the model, you will find if the image was tagged as a soft motion or a violent one, plus the level of certainty about the prediction. After seeing this information, you will decide if you want to make changes to your NN or the layer parameters and repeat the process again until you are happy with the results. Again, the Sony Neural Network Console has a feature to do this in an automatic way, if you run the structure find, the console will make "random" changes to the structure, train it, evaluate it, in order to achieve a better accuracy. There is no need to say that I don't use this method due to the constraints on MCUs. In this scenario you will have to fine tune the parameters yourself.
In the following picture you will see the result of the evaluation, you will see each image and the label assigned to it by the model, in this case, 0 means soft, 1 means violent. You will also see the score for the two possibilities, on the left side, you will see the training and evaluation history and on the right, the stats. The stats are important because you want to achieve the smallest model while keeping an acceptable accuracy.
Deploying the model to the Sony Spresense
I don't like to mix topics, everything regarding coding with the Sony Spresense is covered on the Building Reactive Devices and Building Reactive devices with the NuttX SDK (Coming soon!) sections. however, I want to give you a rounded vision about the entire process.
So, once everything is done, you are going to export the model to the Spresense (NNabla) C Runtime, that process will generate two files that you will save in the Spresense SD Card, those files contain the optimized model.

In order to run the inference on the Spresense, you will have to write a few lines of code (beyond the ones needed to read the sensor data, generating the sample and the rest of your application), as I said, I will publish a curated version of everything as soon as I can, for now, these are the steps to run the inference:
/* --- To use the SD Card --- */
#include <SDHCI.h>
SDClass sd;

/* --- To use the Deep Neural Network Runtime --- */
#include <DNNRT.h>
DNNRT dnnrt;

/* --- Open the model you exported (I renamed it) --- */
File modelFile= sd.open( "/MotionNN.nnb" );

/* --- Initialize the DNNRT --- */
int rc= dnnrt.begin( modelFile );

/* --- Create a variable for your captured sample, in this case,
       a 180x60 black and white picture, you will have to dump
       the sample into this variable --- */
DNNVariable input(180 * 60);

/* --- Feed the NN with the captured data --- */
dnnrt.inputVariable(input, 0);

/* --- Run the inference --- */
 dnnrt.forward();

/* --- Get the result --- */
DNNVariable output = dnnrt.outputVariable(0);
The output value will be an array and the index of the best hit. Pretty easy, right ? it is amazing what MCUs can do nowadays!
I hope you got a clear picture about what it means to define and run AI algorithms on tiny computers, Besides this overview, I will keep posting content related to Machine Vision, GPS, 3D Design, LoRa and all the necessary foundations for an effective release of open source devices like the Smart Connected Collar used as reference for these posts; maybe it will happen at the beginning of 2021 in the case this 2020 ever ends!
Stay tuned!
Comments